If you want to create a TreeVault Antenna tree then you must go through this article. Here, you will find the simple steps to create a TreeVault Antenna tree in FTM 2019. So, move ahead and in case of any difficulties related to the Antenna tree then must reach tech support for quick help and a solution.
What Is Antenna Tree In Family Tree Maker?
With the help of Antenna Tree, you can simply upload an exact copy of Family Tree Maker. It will include the things that don’t sync with Ancestry for instance change logs and web links. So, you can simply use it with the TreeVault cloud services for instance emergency tree restore as well as the FTM connect app.
TreeVault Antenna tree cannot take the place of an ancestry tree. So, you can simply keep the research up to date online. Thus, you can simply share it quickly with others and thus, you can use it in conjunction with Ancestry DNA. Along with that, you cannot share with anyone. But as an alternative, you can sync it with the Ancestry, and thus, you can share the trees via other websites. You can also connect with and download the emergency copy of your respective Antenna tree. Thus, you can access the tree properly.
How To Quickly Create a TreeVault Antenna Tree?
After logging into the TreeVault Antenna tree, you can simply open an FTM tree. Thus, you will be able to automatically create the tree if you don’t have it. So, if you are willing to create it then go ahead to create the Antenna Tree mentioned in the message. After doing so, you have to go ahead to close the option mentioned in the message that has appeared.
Also, note that you can have only one tree at a single tree and thus, one Family Tree Maker source tree can be easily linked to the respective tree. So, later on, if you decide to use a different source tree for creating the tree then the first antenna tree will be quickly deleted. Thus, if you use the Antenna tree for creating a new FTM source tree then only some changes will be made to this new tree and so, it would be applied to it.
You can simply create an Antenna tree from the respective tree with the help of the TreeVault icon. For that, go ahead to the main toolbar or just move to the TreeVault cloud services panel mentioned on the respective current tree tab. It would be on the planned workspace and the details are described below;
Creating a TreeVault Antenna Tree In FTM 2019 For Mac;
Follow the steps mentioned below
- You have to, first of all, move ahead to the FTM 2019 and then open the tree that you have to use as a source tree.
- If you have already logged into the TreeVault then you can directly skip up to step 4. If not then go ahead to the TreeVault icon mentioned on the main toolbar. Or, you have to move ahead to the TreeVault Cloud services panel mentioned on the current tree tab on the plan workspace.
- After doing so, you need to log into your respective account and write down the credentials properly. After writing the email address as well as the password, choose the login option quickly.
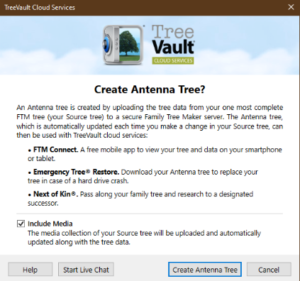
- You have to then go to the TreeVault icon and then you need to select Create Antenna tree mentioned from the pop-up menu.
- You need to then go to the message and choose Create Antenna Tree.
- Finally, after appearing of the message, choose a close option.
Thus, the source data will be easily uploaded in the background and that will allow you to continue working in FTM. The progress of the respective data transfer must be shown in the TreeVault cloud services panel. You will find that on the current tree tab mentioned on the plan workspace.
After creating the tree, it will be immediately linked with the FTM Source tree and thus, the changes that you make will be applied to the tree automatically.
Creating a TreeVault Antenna Tree In FTM 2019 For Windows;
Follow the steps mentioned below
- You have to, first of all, open the tree that you are willing to use as your source tree in FTM 2019.
- If you have logged into the tree then you can move ahead to step 4 directly. But if not then in such case, go ahead to the TreeVault icon mentioned on the main toolbar. Or, you can simply move ahead to the TreeVault cloud services panel mentioned on the current tree tab. You will find it on the plan workspace and then choose the login option.
- Write down the email address instantly along with the password for creating the account soon and then go ahead to the log-in option.
- You have to then give click on the TreeVault icon. After doing so, you need to select the Create Antenna tree mentioned from the drop-down list.
- After appearing in the message, choose Create Antenna tree.
- Finally, you have to choose the close option after appearing in the respective message.
After doing so, the data of the source tree will easily start uploading in the background. It will help in allowing you to continue working in Family Tree Maker while it is happening. So, the progress of the data transfer can be easily shown in the TreeVault cloud services panel. You will find it on the current tree tab mentioned on the plan workspace.
After creating the TreeVault Antenna Tree, it will be immediately linked with the Family Tree Maker source tree. Thus, if you make any changes to the source tree in Family Tree Maker will be automatically applied to the Antenna Tree.
Need Some Help?
If still, you are facing some issues while creating TreeVault Antenna Tree then must reach the experts right now. You have to tell them about the issues well then only you can get rid of such Antenna tree-related queries. So, reach them quickly for quick help related to the Antenna tree by calling +1-888-257-3335 or Live Chat.
FAQs
Yes, you can use the FTM TreeVault tree on the free FTM Connect mobile app.
To use a tree, you have to create the tree first and then you can use it properly.